Showing posts with label Rich Razzleberry. Show all posts

Friday, 4 September 2015

Splish, splash, splosh


I am enjoying a lazy day off. It's grey outside, but I had wonderful visitors earlier in the day and now I'm just playing around in my craft room, seeing where the mood takes me. Yesterday we had fun night out with the Culinary Consultant, we really need to make an effort to go out a bit more often. The evening started with a very good BBQ meal (some of the best beef ribs I've ever had I'm happy to say) in a small place called Smokeworks in Cambridge (if you happen to be local, and like smoky BBQ, you have to try it out!!). We then had a good laugh at (with?) the puppets from the visiting production of AvenueQ. As we didn't make it home until way past my bedtime last night, I was happy I had had the foresight of taking the day off as I'm a bit tired today. 

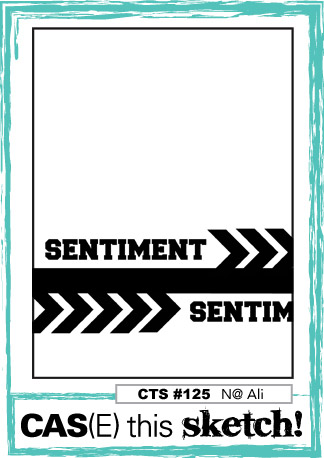
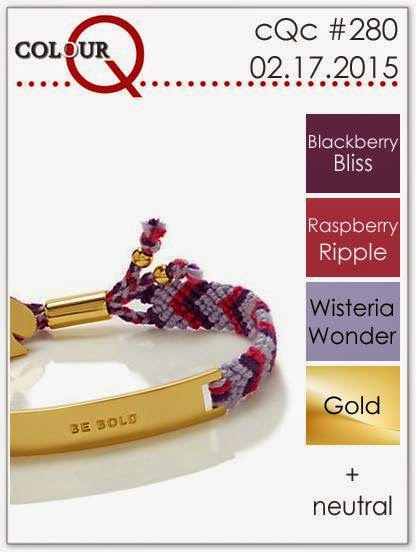
That was a bit of a detour, so back to today's card. It's inspired by several challenges. The layout is inspired by the sketch over at CAS(E) This Sketch, the theme is inspired by the Splash challenge over at CAS on Sundays and the colours are from this weeks colourQ challenge. In addition, I'm linking up with Simon Says Stamp Monday challenge where the theme is trio of colours.


Card: 300 gsm hammered white card, Stampin' Up Rich Razzleberry
Stamps: Stampin' Up Remarkable You, Gorgeous Grunge
Ink: Stampin' Up Pool Party, Wisteria Wonder, Rich Razzleberry, Tsukineko Memento Tuxedo Black
Other: Lawn Fawn Stitched Rectangles dies, Stampin'  Up Hello You dies

Thursday, 18 June 2015

Hello hummingbird


I have to admit I have over-indulged lately. First there was the Cambridge Satchel Company sale, and I mean... it only makes sense, right? I have wanted one of their gorgeous leather satchels for ages, so when it turned out they are on sale, it's just like putting money in the bank. Never mind that I have to pay for my holiday as well from this month's budget... And then I finally caved in and ordered myself a few stamp sets from STAMPlorations. I have been lusting after the sunflower stamp set as well as the sugar rush set for ages and I thought as I'm already so far over budget this month, a bit more won't make any difference. I don't know if anyone can fault that logic? And there was  a very generous offer of free stamps to go with the order, so I just could not refuse. 

Anyhow, my beautiful stamps made it across the Atlantic with lightning speed arriving today and what else is a girl to do than skip the gym and come straight home for some crafty time? The large hummingbird and the morning glory stamps looked perfect for my favourite technique - watercolouring. So off I went and stamped them onto watercolour cardstock in Staz-on ink. I also got to use my other favourite, masking. I think one layered cards with masked images just look so elegant, and I get a childlike feel of excitement to see how it all turned out when you remove the mask and magically you have your images in the foreground and background. I used Stampin' Up markers to colour onto a clear block, and used the ink to watercolour the image. All there was to do was to stamp the simple little sentiment and mat onto coloured card.

My inspiration for this card came from a few challenges. Firstly I was inspired by the bright and summery colour combo over at Colour Me...! I was also inspired by the sketch over at STAMPlorations, althought I did turn it over on the side instead of using it just "as is". I was also inspired by the Simon Says Stamp Wednesday challenge where the theme is to use your favourite technique or products. I'm also linking up at Addicted to Stamps for their 3rd Birthday Challenge (Happy Birthday Addicted to Stamps!!) with the theme Clean and Simple. Last but not least I'm linking up over at the STAMPlorations Anything Goes challenge where you can link up anything created using STAMPlorations products.


Card: Daler&Rowney 300 gsm Aquafine Watercolour paper, Stampin' Up Bermuda Bay and Rich Razzleberry card
Stamps: STAMPlorations Stamp Lab Hummingbird and Morning Glory
Ink: Tsukineko Staz-on Jet Black, Stampin' Up Bermuda Bay, Rich Razzleberry, Old Olive 

Saturday, 30 May 2015

Great CAS(E) this Sketch and some more craft room organizing


Summer and crafting just don't seem to go together. There is so much to do, and the days just pass by so quickly. Of course the fact that I have also spent a few evenings just lazily falling asleep on the sofa while watching TV really doesn't help either, does it? But today I'm home alone and after having finished my rat shopping in the morning (yes, the babies have to eat although daddy is out and about), I did camp out in the craft room and have been multitasking crafting, getting inspired, cleaning and organising.

Today's card is inspired by the awesome sketch over at CAS(E) This Sketch. I was also inspired by the great colour combo over at Colour Me...! I am linking up over at Simon Says Stamp Wednesday Challenge where Anything Goes as well. I went for a very literal interpretation of the sketch this time. I created the chevrons in the background by colouring parts of the Positively Chevron background stamp using markers. I also coloured the Gorgeous Grunge stamps using markers to get the coloured splatters for the background.


I've also been organising my stamps and dies. I finally got the Avery Elle Stamp Storage pockets I ordered a while ago. I think my stamps look so much neater now that they are all in identical pockets. I have put in a cardstock sheet for support in the pockets along with the stamps. For sets with matching dies, I bought some magnetic sheets which I attached to black cardstock, and the dies stay beautifully organised on the magnetic sheets. I have popped the dies into the same pockets with the matching stamps, so now it's always easy to find the matching stamp sets and dies, and I know even the tiny little dies stay safe on the magnetic sheets and in the sealable pockets. Unfortunately some of the larger stamp sets don't fit in the pockets, so I have to figure out something else for them.


Stamps and dies stored in plastic pockets. Matching dies
are stored along with the stamp sets. 
Card: Stampin' Up Rich Razzleberry, Hobbycraft 160 gsm white card, scraps of Bermuda Bay and Tangerine Tango Card
Stamps: Stampin' Up Positively Chevron and Gorgeous Grunge
Ink: Stampin' Up Rich Razzleberry, Tangerine Tango, Bermuda Bay
Other: Stampin' Up Hello You dies


Sunday, 22 February 2015

Fiddly stamp-colouring


It's been a bit of a rough weekend, but thankfully it took a turn for the better today. Lack of sleep really messes with me. But upwards and onwards is the way to go. So I have baked a chocolate bundt cake and a fudge loaf. And made this card.

Today's card is inspired by the absolutely awesome colour combo over at ColourQ. It's no secret I love pink and purple, and gold is growing on me. It wasn't originally my favourite metallic, I used to be a total silver girl. But I have to admit I'm using gold more and more. I was also inspired by yet again a great sketch over at RetroSketches. I'm also playing along at both the Sisterhood of Snarky Stampers (poor poor Edna looks like she's had a worse weekend than I did...) and The Card Concept, both with the theme "Get Well Soon" (in the style Clean and Layered for The Card Concept). I also want to link up at Allsorts Challenge because their badge is so delicious looking, and also because the theme this week is to use some purple.


I love the big central panel in the sketch. It was just a question of what stamp to use to fill it. I have made a similar panel using the same stamp in monochrome blue before, you can see it here. But that was a bit easy, so I thought I could colour it with markers in many colours instead, resulting in quite a bit of fiddly colouring. Half way thorough I almost lost my patience, but thankfully persevered as I think it turned out quite nice. I matted it onto mirri card. The banner is made from a scrap piece of card I made using Distress Paints. Sometimes it's worth saving all those scrap pieces, eventually there will be some place where they fit in. I heat embossed the sentiment in gold on vellum and added three adhesive gems to finish. First I didn't like that the stamping was a bit uneven due to the marker colouring, but after looking at it for a while, I think it's actually quite a nice look.


Card: White 300 gsm card, mirri card, Dovecraft 110 gsm premium vellum
Stamps: Stampin' Up Fresh Vintage, From the Farm
Ink: Tsukineko Versamark, Stampin' Write markers Melon Mambo, Rich Razzleberry, Wisteria Wonder
Other: Scrap piece of Distress Paint coloured card from my endless stash, Papermania adhesive gems, gold embossing powder.

Saturday, 29 November 2014

Bloom with Purple


This week the colour combo over at Colour Me...! is so fantastic, I had to play with it almost immediately. The colour combo, along with the picture over at Stampin' Royalty were my inspiration for this card. It was fun to take a break from the Christmas crafting and create something completely different. I used the sketch over at My Favourite Things. Last but not least I'm entering over at Simon Says Stamp Wednesday Challenge where Anything goes. 


I created the background panel by stamping the lovely large flower from Bloom With Hope in Versamark and heat embossing in clear powder. I then inked the card using distress inks, and spritzed some water to create that lovely splotchy look. I adhered two strips of lace, one which I had coloured with the same Blendabilities I used for the focal flower. To finish, I added some stickles to the flower. I also did some stamping and inking inside the card.

Card: Stampin' Up Rich Razzleberry, Hobbycraft 160 gsm white card
Stamps: Stampin' Up Bloom With Hope
Ink: Tsukineko Versamark and Memento Tuxedo Black, Tim Holtz disters inks in Dusty Concord, Peacock Feathers, Seedless Preserves and Victorian Velvet
Colouring: Stampin' Up Blendabilities Rich Razzleberry
Other: lace from my stash, Ranger Tim Holtz distress stickes Dusty Concord

Saturday, 8 November 2014

Diamond sparkle snowflake


I really should get a snowflake stamp set with matching dies. Fussy cutting these snowflakes are a p-a-i-n! But I feel this time it was worth the trouble. 

This card is inspired by the great sketch over at Freshly Made Sketches. It's also inspired by The Friday Mashup where the challenge is to use the Diamond Dust Technique and the colours Island Indigo, Garden Green & Rich Razzleberry (or similar colours). I'm also linking up at Craft Your Passion where the theme is Bright and Sparkly and the new STAMPlorations November challenge where the theme is stamping and layers. I would also like to enter Completely Christmas where the theme is Anything goes with a twist... Add Blue and Sweet Stampin' Christmas where the theme is Snowflakes for a few more days.

I stamped the snowflakes in Marina Mist and Pear Pizzazz to create the background. I stamped and fussy cut three snowflakes in Marina Mist, Pear Pizzazz and Rich Razzleberry. Then I stamped the snowflakes all over with Versamark, and heat embossed with sparkling embossing powder. I assembled the snowflake using foam pads to give it some dimension. I love the subtle sparkle from the embossing powder. I stamped the greeting in Rich Razzleberry and tied a bow using purple ribbon. Last I matted everything onto Marina Mist cardstock and attached to white card.

The glitter embossing powder gives a nice subtle shine.

Card: Leonardo Stationery 300 gsm white card, Stampin' Up Marina mist card, Hobbycraft 160 gsm white card
Stamps: Penny Black All is Bright, Papermania Urban Stamps 12 Days of Christmas Word Banner
Ink: Marina Mist, Pear Pizzazz, Rich Razzleberry, Tsukineko Versamark
Other: Papermania Holographic glitter embossing powder, purple ribbon from my stash

Wednesday, 29 October 2014

Another great Retro Skech and Colour Me


I wasn't going to post today, but I ended up doing a bit of crafting despite my Mojo being dead and gone once again.

Week after week I love the Retro Sketches. They never disappoint. This time I had too many ideas, and I started with one card, which didn't turn out as I wanted so I made this instead. Then I tweaked the first card and it turned out better than this one, but you will have to wait until tomorrow to see it. This card is also inspired by the new Colour Me...! challenge where there are two different colour combos to choose from.


Card: Leonardo Stationery 300 gsm white card, Hobbycraft 160 gsm white card, Stampin' Up Pear Pizzazz
Paper: Stampin' Up Sweet Sorbet
Stamps: Stampin' Up Chalk Talk, Petite Petals 
Ink: Stampin' Up Rich Razzleberry, Pear Pizzazz
Other: Stampin' Up Chalk Talk Framelits, Petite Petals Punch, Papermania Rhinestones Capsule Verde and Capsule Heather

Monday, 29 September 2014

Happy lizard-y birthday


Today's card is a very CAS one, inspired by this week's Freshly Made Sketch and Addicted to Stamps and More where the theme is Clean and Simple.


I have been so excitedly buying more crafting stuff that I have completely forgotten about using all my lovely stash, which once were the new things that I wanted so badly. This card uses a great Stampin' Up set called Tag It which matches the Chalk talk dies. 

I coloured the stamp using my Stampin' Write markers. The papers are from a birthday set I bought a long time ago, and as usual haven't gotten around to using nearly enough. I also made banners from the paper for the inside of the card, and stamped the cute little lizard-y thing a second time. You can never have too many cute little lizard-y things on a birthday card!

Cardstock: Leonardo Stationery 300 gsm white card, Hobbycraft 160 gsm white card
Stamp: Stampin' Up Tag It
Ink: Stampin' Write markers Melon Mambo, Daffodil Delight, Wild Wasabi and Rich Razzleberry
Paper: Docraft Papermania Happy Birthday To You
Other: Green ribbon from my stash, Stampin' Up Chalk Talk dies

Thursday, 25 September 2014

CASEing the catty


This is the end of the current Stampin' Up Catty, CASEing the catty has reached the last section entitled Artistic Expression. So I thought I better play along as they will move on to the holiday catty next and I have virtually nothing from there, so I won't be able to play along much. But this time I got to play along, and whip out my Blendies. My inspiration is from page 166 in the UK catty (seems to be page 168 in the US catty I have downloaded, not sure where the difference is) and looks like this


From the Stampin' Up Annual Catalogue page 166
Making this card I realised I don't have any neutral DSPs at all, something I surely need to rectify soon. So I went with a monochrome banner instead. I used a stamp from the So Very Grateful set as I don't have the Vivid Vases stamp. For the sentiment, I used a marker to colour the text from one of the speech bubbles from Just Sayin'. I don't have a nice die to cut out the stamp, so I just fussy cut using a template I downloaded online.

Card: Craft UK kraft card, Stampin' Up Whisper White, Chocolate Chip and Rich Razzleberry card
Stamps: Stampin' Up So Very Grateful, Just Sayin', Gorgeous Grunge
Ink: Tsukineko Memento Tuxedo Black, Stampin' Up Crumb Cake, Blendabilities Coastal Cabana, Daffodil Delight, Old Olive, Rich Razzleberry 
Other: Doily and twine from my stash (non-SU)

Friday, 19 September 2014

Happy cupcake


Today's card is a quick make. Well, it would have been a quick make had I not had to do it twice. Let's just say something irreversible happened to the first version due to a tired crafter who put her scissors through the wrong pink cardstock - the ready card base with all layers attached, and left upside down on the crafting desk instead of a another pink piece of cardstock that was actually meant to be cut. And when you make something for the second time, it's no longer as fun... But it's here now, all photographed and tucked away safely in the ever growing collection of finished cards (I'm good at making cards but very bad at sending them). 

Today's card is inspired by three challenges. A very CAS sketch by Retro Sketches. A stunning colour combo by ColourQ. The theme "Tea and/or cake" over at Make My Monday. After that, it was just a bit of stamping, inking, cutting, glueing and Bob's your uncle. I love this week's colourQ colour combo as I think it's the first time ever I used my Summer Starfruit ink, which I bought in a deliberate attempt to use more yellow in my cards, and have failed so far.


I stamped a few random cupcakes
and cherries inside the card as well.
Cardstock: Leonardo Stationery 350 gsm smooth white card, Hobbycraft 160 gsm white card, Coloured 240 gsm kraft card baby pink
Stamps: Stampin' Up A Cherry on Top, Yippee-Skippee
Inks: Stampin' Up Blushing Bride, Calypso Coral, Summer Starfruit
Paper: Stampin' Up Sycamore Street DSP
Other: gold sequins from my stash


Saturday, 13 September 2014

Yellow and purple birthday flowers


Saturday morning is usually one of my most productive times in the craft room. Today however an early morning loaf of bread upset my routine, and therefore I almost didn't manage this post. Two days in a row when I have struggled with getting a photo of my card as the sun is setting earlier and earlier. You think I would have learned, but no... Today's card is inspired by the current Viva La Verve sketch and a truly stunning colour combo from Colour Q challenges. 


Unfortunatley I don't have any of the new STampin' Up colours, so I had to make some substitutions. I used Rich Razzleberry instead of Blackberry Bliss, Smoky Slate instead of Going Gray, and Daffodil Delight instead of Hello Honey. Unfortunately Daffodil Delight and So Saffron are quite similar, so it's hard to see from the photo that there are two different yellows in the card. 

Card: Leonardo Stationery 350 gsm Smooth White card, silver grey cardstock from my stash, Stampin' Up Rich Razzleberry and Daffodil Deligth card, Hobbycraft 160 gms white card
Stamps: Verve Surely Goodness
Inks: Stampin' Up Basic Grey, Stampin' Markers in Rich Razzleberry, Smoky Salte, Daffodil Delight and So Saffron
Other: Stampin' Up Basic Adhesive Gems

Thursday, 28 August 2014

Purple flowers two ways


My sister wanted me to make a birthday card for one of her friends. The instruction I got was that it should be combination of this and this card. I wasn't quite sure what that would entail, so I ended up making two possible cards she can choose from. For the first one, I used the layout from Stamplorations sketch #18


For the second card I used the layout from The Challenge #13. I do love the colour combo as well, so I will most certainly be back there playing before the end of the challenge with the colours as well. I already got very inspired by the DT creations over there and know exactly what card I want to make for the challenge. But back to the card at hand.


I stamped the Hero Arts Layered Flowers in StazOn onto watercolour paper, and coloured with Rich Razzleberry marker and an AquaFlo brush. I then fussy cut all the layers of the flowers, attached with dimensionals and added stickles to the edges and the middle of the flower. I printed the sentiment onto vellum using my new favourite font called Jane Austen and die cut the letters for the other card. Then it was just about layering everything into place.

Card: Leonardo Stationery 300 gsm white card, coloured 240 gsm kraft card in purple grape and lavender, Daler & Rowney 300 gsm Aquafine watercolour paper, Dovecraft 110 gsm premium vellum
Paper: Immediate Media The Country Diary of and Edwardian Lady Designer Paper (exclusive to Cardmaking and Papercraft)
Stamps: Hero Arts Layered Flowers
Ink: Tsukineko StazOn Jet Black, Stampin' Up Rich Razzleberry marker
Other: Tim Holtz alterations Inside Out alphabet die, Papermania adhesive gems Capsule Heather

Tuesday, 26 August 2014

So Very Grateful for Blendabilities


It's probably quite evident by now that I rely very heavily on online crafting challenges to find inspiration for making my cards. It makes the whole creative process so much easier when I have a sketch and/or colour combo to focus on. I'm sure many artsy people groan at the thought of speeding up the creative process, and scream out objections along the lines of "art shouldn't be hurried" and "it's all in the process". While I don't object in any way to sitting down, doodling and waiting for creativity to strike (or slowly build as it more often does), most days I don't have the patience for that. That's for true artists. I'm just a simple card crafter, and I like to stamp and colour. Everyone should go with what works for them. And today what worked for me was CAS(E) This Sketch and Just Add Ink


The wonderful inspiration from these challenges led to today's card, and even if I say so myself I think it turned out rather nice. I love flower stamps, and I particularly love this set called So Very Grateful from Stampin' Up. It's perfect for colouring, and the two flower stamps in the set allow many different layouts. I have made other cards with it (here and here) which has a completely different feel, so it's a very versatile little set. This time I tired my hand at using the Blendabilities, which are a set of new alcohol based markers from Stampin' Up. I really like the feel of them, they blend beautifully. I had so much fun colouring the card that I couldn't resist stamping inside the card as well.


Cardstock: Coloured 240 gsm kraft card in Purple Grape, Leonardo Stationery 300 gsm white card, Dovecraft 110 gsm premium vellum
Stamps: Stampin' Up So Very Grateful, Paper Smooches Sentiment Sampler
Inks: Tsukineko Memento Tuxedo Black, Stampin'Up Blendabilities Old Olive and Rich Razzleberry, Stampin' Write marker Calypso Coral
Other: Stampin' Up Basic Pearls