Showing posts with label guest DT. Show all posts

Monday, 26 August 2019

Cupcake Inspiration Challenge #447


It's time for another Cupcake Inspirations Challenge, and STAMPlorations is the sponsor this time, so I'm excited to be one of the STAMPlorations designers guesting over at CIC. The theme is Food and Drink, my favourite! I could not resist inking up the delicious ice cream cone from STAMPlorations Sweet Cravings using Distress Markers. I stamped a sentiment from the same set in black and added Washi tape.


Stamps: STAMPlorations Sweet Cravings
Ink and colouring: Tsukineko Memento Tuxedo Black, Tim Holtz Distress Markers

Saturday, 24 February 2018

The Sisterhood Of Snarky Stampers - T is for Tissue


I am so excited to be guesting over at one of my favourite challenges - The Sisterhood of Snarky Stampers. I had so much fun playing with Becca's llamas for their F is for Farm challenge that my llamas won me the coveted crown of Queen of Snark which I have been wearing with great pride the past week (just imagine the looks I get at work...). The bonus prize is that I get to guest design with the fabulous Sisters for their new challenge themed T is for Tissue. You can see poor Edna feeling a bit under the weather with one of the many winter bugs we have had going around, I hope she feels better soon. I took the liberty to interpret the challenge in a slightly different way and decided instead that T is for Tissue paper Tutu!


I started by stamping one of the Flamingos from Lawn Fawn's Flamingo Together, colouring with Copics and die cutting using the matching die. I then took a few small pieces of pink tissue paper, layering them, glueing them together and scrunching them up to look like a mini tutu. Then I fussy cut the wing of the flamingo so that I could attach the tutu to the back of the wing. I also die cut the crown using gold glitter card and a die from Critters Ever After, adding some adhesive gems to it. I didn't have a stamp with the sentiment I wanted to use so I printed most of it onto white shimmery card and then stamped the word Pigeons using Violet's ABCs in Versamark and heat embossed in silver. Then I splattered some Tim Holtz Picked Raspberry ink onto the card and die cut it with a Lawn Fawn stitched rectangle. Last, I added the card front to some ombre pink/purple card, adding the flaming to the card front and decorating the layers of the tutu with Ranger Ice Stickles.


Card: White shimmer card, Hobbycraft 190 gsm white card, gold glitter card, ombre pink card
Stamps: Lawn Fawn Flamingo Together and matching dies, Violet's ABCs
Ink and colouring: Tsukineko Versamark, Memento Tuxedo Black, Tim Holtz Distress Ink Picked Raspberry, Copics
Other: Lawn Fawn Critters Ever After and Stitched Rectangles dies, Papermania silver embossing powder, adhesive gems from my stash, pink tissue paper from my stash, adhesive pink gems from my stash


Saturday, 28 October 2017

Just Us Girls GD - Photo Week


Time flies when you are having fun, and this is my last week guest designing for the wonderful Just Us Girls. It's been so much fun, thank you so much ladies for having me and all the hard work you do to keep the challenge going! I'll see you soon again in the link-up for future challenges. 

This week is Photo inspiration, and you can see a bigger version of the image below. Just look at those gorgeous colours and fun texture. I was inspired by the beautiful background, and I used Brushos to re-create the spotty look and using similar colours to the inspiration image. I then added a feather and sentiment in white heat embossing using the STAMPlorations Trendy Feathers 2 stamp set.


Card: 300 gsm white card, Daler&Rowney 300 gsm watercolour paper, scraps of black card
Stamps: STAMPlorations Trendy Feathers 2
Ink and background: Tsukineko Versamark, Brushos
Other: CUTplorations Crazy Double Running Stitch Rectangle Nesting Dies, Papermania Seafoam White embossing powder

Saturday, 21 October 2017

Just Us Girls GDT - Colour challenge


Saturday means a new Just Us Girls Challenge! I've had super fun Guest Designing for the talented team, and sad that this is already my second to last week with them. And what a super fun colour combo it is. Perfect for Halloween - or anything else that tickles your imagination. I've been enjoying lots of fun with my Lawn Fawn critters lately and this card is no exception. I decided to dig out my Pop-Up Hillside die and create a spooky Halloween Night scene with some poisonous mushrooms and little critters dressed out as witches.


This is what the outside of the card looks like
I created the sky by die cutting the Puffy Cloud Borders in scrap paper. First I inked the background card in light purple and then added more purple using the Puffy Cloud Borders as masks, using darker purple and finally black to create a gradient. Then I splattered the whole background with water for an even spookier effect. I die cut the pop-up hills in black card and added some forest border and stitched tree borders die cuts to them. Then I stamped the critters on white card, coloured them with Copics and die cut using the matching dies. 


I can't wait to see what you create with this week's colours.

Card and paper: Stampin' Up Basic Black card, Neenah Solar white card, Lawn Fawn Perfectly Plaid Rainbow
Stamps: Lawn Fawn Holiday Party Animal, Gleeful Gardens, Critters Ever After, Hats Off To You all with matching dies and Happy Everything
Ink and colouring: Tsukineko Memento Tuxedo Black, Copics, Tim Holtz Distress Ink Wilted Violet, Dusty Concord, Black Soot
Dies: Lawn Fawn Stitched Hillside Pop-Up, Stitched Tree Borders, Forest Border, Puffy Cloud Borders, Stitched Rectangles, Scripty Happy
Other: Papermania Seafoam White embossing powder

Saturday, 14 October 2017

Just Us Girls GDT - Peek-A-Boo card


It's Saturday and that means a new challenge over at Just Us Girls. I had a great time enjoying all the inspiration in the gallery last week. I hope you will enjoy this week's challenge, it's a fun technique challenge to create either a window or peek-a-boo card. There are some technique videos you can watch for inspiration   


When I thought of a window card, I immediately thought of happy puppies waiting at home by the window for you to come home. That must be the most heartwarming sight to come home to! I first tried to make the curtains from ribbon but that didn't work at all, so I used the Lawn Fawn Gingham Backdrops stamp instead and it turned out much better. I added some flowers from Gleeful Garden, and a few colourful butterflies. 


Card: 250 gsm white card, Neenah Solar White card, kraft card
Stamps: Lawn Fawn Critters at the Dog Park and matching dies, Gleeful Garden and matching dies, Claire's ABC, Gingham Backdrops, Stampin' Up Hardwood
Ink and colouring: Stampin' Up Chocolate Chip, Real Red, Tsukineko Memento Tuxedo Black, Copics
Other: Lawn Fawn Stitched Square Stackables, Stitched Scalloped Borders 

Saturday, 7 October 2017

Just Us Girls GDT - Light


I'm super excited to join Just Us Girls as their October Guest Designer. Thank you so much to the JUGS team for the invitation to join. I love playing along with their challenges, and super excited to have the chance to share some inspiration with you all. Hope you will join us for the fun "Light" theme this week.


I thought I would go for a moon and starlight theme for my magical creatures and Distress Inks for the background. I started by cutting out two circular masks, one bigger and one smaller. I inked through the larger circular mask using Squeezed Lemonade distress ink onto my card front in Neenah Solar White card. Then I switched to the smaller circular mask which I centred within the circle I had inked and continued to ink in Mustard Seed and Spiced Marmalade. Next, I masked out the whole big circle and inked in Wilted Violet, Dusty Concord and Chipped Sapphire Distress ink, adding more colour around the edges of the card, and keeping the colour lighter the closer to the circle I got. I also inked a piece of card in Hickory Smoke and Black Soot, as well as another in Twisted Citron and Mowed Lawn. Then I splattered water onto all the cards I inked, and I used a wet brush to blend the colours of the moon. Next, I die cut the mountains from the inked grey card using Lawn Fawn Stitched Mountain Border, the green one using the Grassy Border die, and I used the Forest border die to cut a piece of black card. I also used the Starry Skies die to cut out the stars and shooting star, adding yellow and pink card behind the card front for the yellow starlight to shine through. Last, I stamped the castle, dragon and unicorn from Critters Ever After, coloured them with Copics and die cut the matching dies. Then I attached all the different layers of the background and the critters in the foreground, lastly adding a sentiment from the Party Animal stamp set. I had forgotten how much fun it is to create backgrounds using Distress Inks and to splatter water onto them, watching the ink fade away under the water droplets!


Card: Neenah Solar White card, scraps of black, yellow and pink card
Ink and colouring: Tsukineko Memento Tuxedo Black, Tim Holtz Distress Ink Hickory Smoke, Black Soot, Twisted Citron, Mowed Lawn, Wilted Violet, Dusty Concord, Chipped Sapphire, Mustard Seed, Spiced Marmalade, Squeezed Lemonade, Copics
Stamps: Lawn Fawn Critters Ever After and matching dies, Party Animal
Dies: Lawn Fawn Stitched Circle dies, Starry Skies, Stitched Mountain Border, Forest Border, Grassy Border

Friday, 8 September 2017

CAS on Friday Guest Designer


I was so excited to see that my giraffe card was chosen as the winner of CAS on Friday a few weeks ago, which means I have the honour to be a Guest Designer with them this week. The theme this week is Color Me Pretty, which means you should use pencils or markers to colour your creation. Thank you again to the CAS on Friday team for picking my card as the winner and for all the work you do to bring this great challenge to us crafters.


For my card, I chose to use the gorgeous STAMPlorations Blossom Sprays #3 from the fab Deepti of Dee's Art Utopia. I stamped it in Memento Tuxedo Black onto Neenah Solar White card and heat embossed with clear powder before colouring it with Copics. To keep everything as CAS as possible, all I did was cut out the panel using the Crazy Double Running Stitch Rectangle Nesting die and stamped a small sentiment from Trendy Feathers 2. Sometimes it's so much fun to make cards which only require a minimum amount of stash and let a beautiful stamp just shine on its' own.

Card: 250 gsm white card, Neenah Solar white card
Stamps: STAMPlorations Blossom Sprays #3Trendy Feathers 2.
Ink and colouring: Memento Tuxedo Black, Copics
Other: STAMPlorations Crazy Double Running Stitch Rectangle Nesting die, Ranger clear embossing powder

Thursday, 2 March 2017

Time Out 3 Year Celebration


I'm super excited to be part of this special post to celebrate the Time Out Challenge 3rd birthday. Happy Birthday Time Out, here's to many more! I love playing along with Time Out and would like to thank the amazing DT for their amazing inspiration and fun challenges. As Shery of STAMPlorations fame is on the Time Out DT, STAMPlorations is one of the sponsors of this special Time Out Challenge and therefore we are also celebrating over at the STAMPlorations blog. 

The theme for the new challenge over at Time Out is Love/Friendship with the optional twist of spotlight stamping. This means that you choose to only colour in a specific part of your stamped image. I went a slightly different direction but still with the same theme and stamped a lot of the yummy donuts from my favourite ever STAMPlorations stamp set called Sugar Rush, and then only coloured in one of pair of donuts to highlight them. I then added some Wink of Stella glitter to the donut glaze, it doesn't show very well in the main image but I tried to show the subtle shimmer in the spotlight image below. As a finishing touch I added a rain of pink sequins to the top of the card. 

Don't forget to hop over to Time Out to take part in this birthday challenge with lots of prizes, and to also visit STAMPlorations as there will be extra prizes to be won there. Now if you excuse me, I might just have to nip off to the shops to get me a donut as I suddenly had a craving for them... If you got a craving for STAMPlorations products, don't forget you will get 20% off if you use the code STAMPGIRLKAROLA at checkout (more info at the end of the post). 


Card: 200 gsm white card, scrap of pink card
Stamps: STAMPlorations Sugar Rush
Ink and colouring: Tsukineko Memento Tuxedo Black, Copics
Other: Wink Of Stella glitter pen, small sequins from my stash


STAMPlorations discount code: If you want to save 20% when shopping at the STAMPlorations store you can use the code STAMPGIRLKAROLA at checkout. The discount applies to all normal priced and discounted stamps, stencils and dies. The code cannot be combined with other discount codes. If you have any questions or problems, just let me know!

Sunday, 12 February 2017

Cupcake Inspirations Challenge


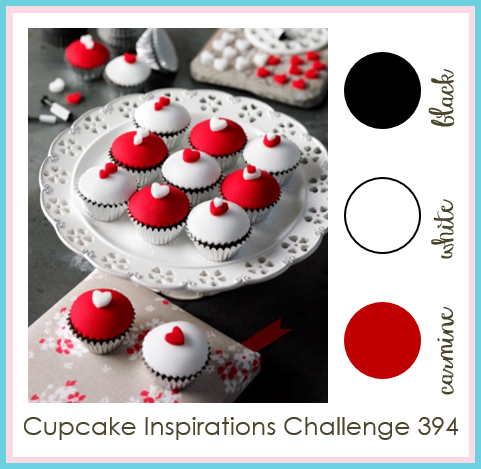
Today I'm very excited to be guest designing over at Cupcake Inspirations as the current challenge is sponsored by STAMPlorations.  I always love the gorgeous cupcake images for this challenge, although I have to admit they sometimes make this recovering sugaroholic crave a fix... But at least I can channel all of that sugar craving into my crafting instead! This time the colour combo is a dramatic red - white - black. 


CIC394-feb12.png


I decided that the dramatic colours would look stunning on the equally dramatic Bloom Boldly stencil, so I inked through the stencil with Distress Inks. I love how the little hidden hearts in the stencil image match with the little hearts on the cupcakes! The Festive Berries red was absolutely perfect to match the red in the inspiration image, it's so vibrant. I then spritzed some water across the image to give it a little bit of a grunge-y and distressed look. Last, I die cut the sentiment using the Thanks Word Die and added some Crystal Effects to it although it doesn't show very well on the picture. I added three red rhinestones for a finishing touch and matted the panel onto black card before adhering to a white card base. If you got inspired to add some STAMPlorations goodies to your stash, you can use my discount code STAMPGIRLKAROLA at the check-out in the STAMPlorations store to receive 20% off your order (see below for more info)!

Card: 250 gsm white card, 250 gsm black card
Ink: Tim Holtz Distress Ink Black Soot and Festive Berries
Stencil: ARTplorations Bloom Boldly
Die: CUTplorations Thanks Word Die
Other: Stampin' Up Crystal Effects, adhesive rhinestones from my stash

STAMPlorations discount code: If you want to save 20% when shopping at the STAMPlorations store you can use the code STAMPGIRLKAROLA at checkout. The discount applies to all normal priced and discounted stamps, stencils and dies. The code cannot be combined with other discount codes. If you have any questions or problems, just let me know!

Monday, 7 December 2015

Guest Designing over at The Challenge


As you are reading this I am spending a long weekend with my bestest friend ever. We hardly ever get to see each other after she went back home and I stayed over here in the UK. So right now we are having a girl's weekend in Riga. But I scheduled this post to go live right at this moment as I have a really special card to share today. I was absolutely chuffed to bits when I saw that my macaron card was picked as the winner over at The Challenge a few weeks ago. It's always a thrill to see one of my cards picked as a favourite in one of the challenges, it's just so nice to know someone else enjoyed something you made. The prize you get for winning is the honour of joining the amazingly talented DT as a guest designer. So thank you to The Challenge DT for having me, and for you for popping over to my blog to see my creation. For the next week The Challenge is to create something using the sketch below. So come and join us over at The Challenge to see what the wonderful DT has created to inspire you, and then get creative and don't forget to share your gorgeous creations!


This is such a great sketch as it will really let your imagination run free. I'm not very good with using circles, and I always try to replace them with another shape. I absolutely adore the Lawn Fawn Stitched Snowflake and Mini Snowflake dies, and I used them with vellum to create a beautiful snowflake flower. I have to admit that despite a penchant for stockpiling patterned paper, I don't have very much Christmas themed paper. I do have a Stampin' Up set from last year called All Is Calm, and I love the delicate snowflakes and gorgeous colours on it. So I decided to use that for the strip of patterned paper and create a watercolour background using Distress Inks in similar colours. I die cut a piece of watercolour paper using a Stitched Rectangle die and watercoloured an ombre background using Cracked Pistachio, Peacock Feathers and Mermaid Lagoon, splattering some ink onto the background as I went along. I heat embossed the sentiment from the Winter Penguin stamp set from Lawn Fawn in white powder and added a few adhesive gems and finally a dash of glitter using a Wink of Stella pen.

A closer look at the vellum snowflake embellishment. You 
can just about see a bit of the glitter on it, but it doesn't show
up very well in the photo.
I would like to link up my card with the following challenges:
Unicorn Challenge - Winter Theme
CAS-ual Fridays - Snowflake
Make My Monday - White Christmas
Time Out - Snowflakes are Winter's Butterflies
Our Crafty Corner - Anything Goes/Winter

Card: 300 gsm white card, 300 gsm watercolour paper, Dovecraft 110 gsm premium vellum
Paper: Stampin' Up All Is Calm
Stamps: Lawn Fawn Winter Penguin
Ink: Tsukineko Versamark, Tim Holtz Distress inks in Cracked Pistachio, Mermaid Lagoon and Peacock Feathers
Other: Lawn Fawn Stitched Rectangles, Stitched Snowflake and Mini Snowflake dies, Papermania Seafoam White embossing powder, adhesive gems from my stash, Wink of Stella pen

Wednesday, 30 September 2015

Color Throwdown Guest DT card


I'm absolutely over the moon to share this card with you, as it's my Guest DT creation for this week's Color Throwdown which launches today. It is one of my "go to" places for inspiration, the DT is bursting with talent and the colour combos are amazing. I like to play along as often as I can. And today I have the great honour to join Tammy and her team of incredibly talented ladies to hopefully inspire you to play along with the rich colours you can see below. When I saw the colour swatch I immediately thought of an autumn theme, but as I had just created a few autumn watercolour scenes, my brain quickly moved on to Christmas instead because of the red and green. And the orange - what else could it be than a crazy beak? Can you see I still have Crazy Birds on my brain? So my little Crazy Santa was born. He wasn't born without considerable labour pains though, as this card is version three in the creative process. You can see version two below, and you won't see version one unless you have a good old dig around in my bin. But as most mother's would say, you forget the pain when you publish a blog post about your newly born card. Now it's your turn to link up over at Color Throwdown to inspire us with your gorgeous creations!


I created the background using my new favourite toy, the Tim Holtz Spritzer tool. I used the Lawn Fawn Mini Snowflake die cuts as masks, and spritzed several hues of brown distress markers to create the background. I absolutely adore that spritzed look. I stamped Santa birdie and his hat and candy cane onto watercolour paper and watercoloured using distress markers. Version two is coloured with Copics, and although I like the vibrant colours, I still like the muted earth tones of bird number three more. To finish, I die cut a frame using Lawn Fawn Stitched Rectangle dies, added some Ice Stickles to the hat and some Glossy Accents to the candy cane. The sentiment is from the Lawn Fawn Joy to the Woods stamp set.


I would like to link up with the following challenges:
The Friday Mashup - Use a die cut to create a frame 
Crafty Hazelnut's Christmas Challenge Extra - Anything Goes
The Artistic Stamper - Things With Wings
Aud Sentiments Challenge Blog - Christmas
Clear It Out - Theme: Things with wings, stash:glitter (there is some stickles on the Santa's hat although it doesn't show very well in the image)
Papertake Weekly - Take your pick (autumn colours) 

Card: 300 gsm hammered white card, 240 gsm coloured card Chocolate Brown, Daler&Rowney 300 gsm Aquafine watercolour paper
Stamps: Tim Holtz Stamper's Anonymous Bird Crazy and Matching Dies, Crazy Things, Lawn Fawn Joy to the Woods
Ink: Staz-on Jet Black, Tim Holtz Distress Markers Ground Espresso, Gathered Twigs, Vintage Photo, Tea Dye, Antique Linen, Festive Berries, Barn Door, Fired Brick, Mowed Lawn, Frayed Burlap, Spiced Marmalade, Abandoned Coral
Colouring: Copics (on the smaller card) BG 10, R24, R46, R89, YG11, YG13, YG15, YR04
Other: Lawn Fawn Mini Snowflake Dies, Stitched Rectangle Dies, Merry Christmas border die (on the smaller card), Stampin' Up Glossy Accents, Ranger Ice Stickles

Friday, 7 August 2015

STAMPlorations sketch challenge guest DT August


I'm so excited to be joining the talented STAMPlorations team for another guest DT spot, this time for the August sketch challenge. You may have seen my guest post for the July sketch challenge here, and after using a STAMPlorations digi for that card I decided to get a few of my favourite STAMPlorations sets. I've already made a few cards and I absolutely love the stamp sets I have (you can find a few cards here, here, here, here and here). When I saw the August sketch, I immediately saw doughnuts and macaroons. Ok, so I may see doughnuts whenever I close my eyes, but luckily it happened to work well with the sketch.


I am crazy about doughnuts. I stop by the Krispy Creme display in the store just to talk to the doughnuts... I know, I'm crazy. I made my own doughnuts a while ago, you can see them here. I actually made macaroons myself also, you can see them here. So I absolutely adore the Sugar Rush stamp set and had such a great time playing with it for this sketch.

This is probably as much mixed media as I'll ever do, but STAMPlorations always inspires me to at least try to get a bit more experimental. I started by creating the background using Tim Holtz distress paints and lots of spritzed water. I dabbed the paints onto a craft mat, spritzed with plenty of water and smudged the paper around in the colours, adding a dab here and there for more colour. Then I stamped a few sentiments from the Sugar Rush set onto the background, and heat embossed them in white. I stamped the macaroons and doughnuts in Staz-on, watercoloured using distress markers and a waterbrush and fussy cut them. For the sentiment I used a scrap of Tim Holtz Old Paper cardstock and stamped the sentiment in Vintage Photo and heat embossed in clear embossing powder. I also inked the edges of the banner in Vintage Photo. Last, I arranged everything onto the background, added a few sequins and added some Glossy Accents to the doughnuts to give a bit of gloss to the icing. Unfortunately it doesn't show very well in the images.

I decided to have a card photo-shoot outside instead of my usual windowsill location as it seems like summer is back, hopefully not only for a one day visit. And I decided I wanted to show off my gorgeous hydrangea as well, I absolutely adore it. I thought it matched the colour scheme of the card perfectly. 


I would like to share my sugar-filled creation with the following challenges:
In the Pink - Anything goes as long as it's pink
Addicted to stamps - Anything goes
Creative Moments - Anything goes with summer fun
Fab and Funky - No pattered paper
Try Stampin' - or not - on Tuesday - Inspiration picture

Card: Coloured 240 gsm kraft card baby pink, Daler&Rowney 300 gsm Aquafine watercolour card, scrap of Tim Holtz Old Paper card
Stamps: STAMPlorations Sugar Rush
Inks: Tim Holtz distress markers and a waterbrush, Tim Holtz Vintage Photo, Tim Holtz distress paints Spun Sugar, Victorian Velvet, Bundled Sage, Picket Fence and Broken China, Tsukineko Versamark, Tsukineko Staz-On Jet Black
Other: Ranger clear embossing powder, Papermania Seafoam White embossing powder, Glossy Accents, sequins from my stash


Wednesday, 22 July 2015

Stampin' Royalty Guest DT - Keep It Simple


I can't believe this is already my last post as a Guest Goddess over at Stampin' Royalty. I've had a great time creating with the talented ladies of the DT and feel sad it's already time to say goodbye. The good news is of course that I can pop by and play along whenever I want to, so it's not goodbye, it's just "See ya later"!

This week the challenge is to Keep It Simple. As I have finished my summer holidays, I'm already starting to look forward to Christmas as it will be the next time I will get a bit more time off work (yes, I am very dedicated and hard working...). And I thought it might be a good idea to use my old stash of Christmas crafting goodies to remind me that I don't really need to buy any new Christmas stamps this year, but should instead try to use the stash I have got (ok, fat chance I actually won't buy anything, but still...). 

I stamped the Seasonally Scattered "Merry" sentiment using Soft Sky, and then added some Marina Mist and Pacific Point using markers before stamping onto Whisper White card. I then heat embossed the Christmas sentiment from Endless wishes in silver. I also heat embossed silver snowflakes onto Marina Mist card for the back panel. I thought this was all that was needed for a quick and easy clean card. This would be a great design to mass produce as it's quite quick and easy to make, and it would be easy to make different colour variations of it. 

I would like to link up with the following challenges:
Christmas Stampin' All Year Long - Clean and Simple
Crafty Calendar Challenge - Christmas in July 
My Time to Craft - Christmas in July
Sweet Stampin' - No Designer Paper
Happy Little Stampers - CAS
Card: Stampin' Up Whisper White, Marina Mist
Stamps: Stampin' Up Seasonally Scattered, Endless Wishes
Ink: Stampin' Up Soft Sky, Stampin' Write markers Marina Mist, Pacific Point, Tsukineko Versamark
Other: Silver embossing powder

Wednesday, 15 July 2015

Stampin' Royalty Guest DT - Photo inspiration


I can't believe this is already my third guest post for Stampin' Royalty. Time truly flies when you are having fun, doesn't it. This week we have a gorgeous inspiration photo for you. The colours could not have been more perfectly picked for me! Green and pink is one of my all time favourite colour combos. I absolutely loved making this card. Hop over to Stampin' Royalty to see how the amazingly talented DT have been inspired by the image. Then, please have a play around for yourself and join us as we love to see your gorgeous creations. 


For my card, I was inspired by the beautiful colour combo and the bright pink flowers. I was also inspired by the gold and silver bling in the beautiful jewellery. I started by stamping the large flower from Bloom With Hope in Staz-On onto watercolour paper. I coloured the flowers with pink markers and used a waterbrush to blend the colours. Then I fussy cut the flowers. For the background I stamped the Brushstrokes stamp in Pistachio Pudding. This is such a great stamp, and it certainly has not got all the use it deserves so far. I also die cut two feathers from gold foil. Then it was just a quick job to assemble it all onto a doily, add one of those gorgeous wood veneer sentiments, a bit of silver thread and a few rhinestones. Hey presto! 

I would like to link up with the following challenges:
Simon Says Stamp Monday Challenge - Anything Goes
Fab n' Funky - Flower Delights
Natalie and Amy's Challenge - Summertime
Happy Little Stampers - Sketch

Card: Stampin' Up Whisper White Thick cardstock, Gold Foil
Stamps: Stampin' Up Brushstrokes, Bloom With Hope
Ink: Stampin' Up Pistachio Pudding Stampin' Markers Strawberry  Slush, Melon Mambo, Blushing Bride, Pink Pirouette, Memento Staz-On Jet Black
Other:  Stampin' Up Expressions Natural Elements, Silver Metallic Thread, Tea Lace Paper Doilies, Feathers die, Jewels Basic Rhinestones

Wednesday, 8 July 2015

Stampin' Royalty - Colour challenge


Today is the time to reveal the second challenge for my guest DT stint over at Stampin' Royalty. Thank you for everyone for submitting your gorgeous flower themed creations last week. This week we have a colour challenge for you - Old Olive, Soft Suede, Tangelo Twist and Very Vanilla. If you don't have these colours, you can use anything you have that is close. If you hop over to Stampin' Royalty you will see the gorgeous inspiration from the DT. 


As I went with a super feminine card last week I thought it was time for something for the males this time. I masked off the edges of a panel of Very Vanilla card and used a foam applicator to sponge a light layer of Soft Suede. I then stamped the ship from The Open Sea set. After masking off the ship, I stamped the World map in the background after first stamping it off once so it won't be too prominent. Then I added splotches from the Gorgeous Grunge set, again after stamping them off first. Last, I stamped the sentiment from the Just Sayin' set in Old olive, and fussy cut it. Then I realised I actually have the dies for the speech bubbles and felt a bit silly about fussy cutting. Last, I stamped the anchor from The Open Sea in Calypso Coral and fussy cut that too. As a finishing touch I added some Soft Suede around the edges of the front panel and attached to a Very Vanilla card.

I would like to link up with the following challenges:
STAMPlorationsJuly challenge Stamp and Distress
Inkspirational - Grunge
Make My Monday - The Sea

Card: Stampin' Up Very Vanilla
Ink: Stampin' Up Old Olive, Soft Suede and Calypso Coral
Stamps: Stampin' Up The Open Sea, World Map, Just Sayin', Gorgeous Grunge

Monday, 6 July 2015

Surprise guest DT card


I've been dying to tell you, and today is finally the day. I'm soooo excited to be guest designing for the STAMPlorations sketch challenge as my narwhal card was picked as one of the top picks for sketch #33!!! I love playing along with their amazing sketches so I'm very honoured to be joining the amazingly talented DT for the current challenge. You have lots of time to play along as the deadline for this challenge isn't until the end of July! Hop over to the STAMPlorations blog to see what the rest of the DT have created using this amazing sketch and make sure to join in the fun.

For my card, I was working with the STAMPlorations Tropical Drink digi. I wanted summery colours and went with Stampin' Up Calypso Coral, Pistachio Pudding and So Saffron. I started by watercolouring the background. After the colours had dried, I stamped the Tim Holtz Script and Curiosity stamps, and added some splotches using the Gorgeous Grunge stamp set. I printed the digi and coloured using the same colours. I also printed the digi onto vellum and cut out the glass to give it a more "glassy" look, although it doesn't show very well in the image. I stamped splatters around the glass and sentiment using the Gorgeous Grunge stamp and matted them onto Calypso Coral card. I also added one panel from the Sweet Sorbet DSP. I think it ended up being a wonderfully summery card, and I really want a nice cocktail now...


Card: Stampin' Up Calypso Coral, So Saffron, Daler&Rowney 300 gsm Aquafine watercolour paper, 160 gsm Hobbycraft white card
Stamps: STAMPlorations digi stamp Tropical Drink, Each Day Holds a Surprise, Stampin' Up Gorgeous Grunge, Tim Holtz script and curiosity stamps
Ink: Stampin' Up Calypso Coral, Pistachio Pudding, So Saffron 
Paper: Stampin' Up Sweet Sorbet